The second design pattern in the Structural Category is the Bridge Design Pattern. Let's take a look at this design pattern to understand how to apply this pattern in C# and .Net programming.
Note: code can be downloaded at my Github.
1. What is the Bridge Design Pattern?
In the Bridge Design Pattern, it is essential to "bridge" the Abstraction and the Implementation of a class. The Implementation is an interface that will describe a set of specific behavior that can be used by any Object in our codebase. It can have multiple concrete implementations that adhere to the contract defined in the interface. The Abstraction is the object that will provide an API that will make use of an underlying Implementation. It acts as a layer over the top of the Implementation that can be further refined through inheritance if required.
Bridge is a structural design pattern that lets you split a large class or a set of closely related classes into two separate hierarchies—abstraction and implementation—which can be developed independently of each other.
2. When to use the Bridge Design Pattern?
Say you have a geometric Shape class with a pair of subclasses: Circle and Square. You want to extend this class hierarchy to incorporate colors, so you plan to create Red and Blue shape subclasses. However, since you already have two subclasses, you’ll need to create four class combinations such as BlueCircle and RedSquare.
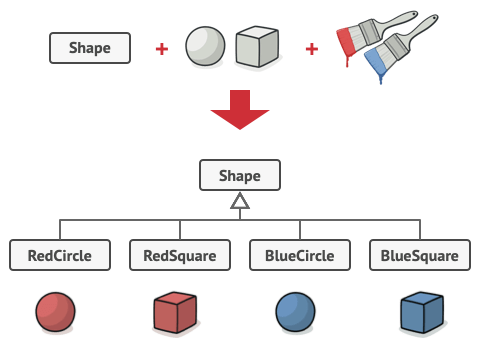
Adding new shape types and colors to the hierarchy will grow it exponentially. For example, to add a triangle shape you’d need to introduce two subclasses, one for each color. And after that, adding a new color would require creating three subclasses, one for each shape type. The further we go, the worse it becomes.
3. How to implement the Bridge Design Pattern?
The Bridge pattern attempts to solve the above problem by switching from inheritance to the object composition. What this means is that you extract one of the dimensions into a separate class hierarchy, so that the original classes will reference an object of the new hierarchy, instead of having all of its state and behaviors within one class.
Step 1: Define an Interface for the Implementation
public interface Color
{
    string Log();
}
Step 2: Define an Abstract class for the Abstraction
public abstract class Shape
{
    public string Type { get; set; }

    public Color Color { get; set; }

    public Shape(Color color, string type)
    {
        Color = color;
        Type = type;
    }

    public override string ToString()
    {
        return $"I am a {Color.Log()} {Type}";
    }
}
Step 3: Create a concrete Implementation
public class Red : Color
{
    public string Log()
    {
        return "Red";
    }
}

public class Blue : Color
{
    public string Log()
    {
        return "Blue";
    }
}
Step 4: Create a refined Abstraction that behaves slightly different
public class Circle : Shape
{
    public Circle(Color color)
        : base (color, "Circle")
    {

    }
}

public class Square : Shape
{
    public Square(Color color)
        : base(color, "Square")
    {

    }
}
So, we can now initiate circle or square objects by calling the Shape constructor and passing the color object as a parameter like below:
class Program
{
    static void Main(string[] args)
    {
        var circle = new Circle(new Red());
        Console.WriteLine(circle.ToString());

        var square = new Square(new Blue());
        Console.WriteLine(square.ToString());
    }
}
Done! By implementing the Bridge Design Pattern like above, we can avoid exponentially growing numbers of shape sub classes and also allow the Implementation and Abstraction grow independently without affecting each other.I hope this post is helpful! Please share your thoughts under the comment section below. See you next time!


