The next design pattern in the Behavioral Category that I want to talk about is the Mediator Design Pattern. Let’s take a look at the definition of this pattern and how to implement it in C# and .Net.
Note: Code can be downloaded at my Github.
1. What is the Mediator Design Pattern?
If your application has complicated dependencies between objects, the Mediator Design Pattern is able to help reduce the chaos. This pattern forces all objects to collaborate via a mediator object instead of communicating with other objects.
The mediator pattern defines an object that encapsulates how a set of objects interact.
2. When to implement the Mediator Design Pattern?
The Mediator Design Pattern is used when:
- Your classes are tightly coupled to a bunch of others that makes it’s difficult to change the classes.
- You can’t reuse the component in different programs because it’s to dependent on other components.
- Your application has many component subclasses just for the purpose of reusing some basic behavior in various context.
3. How to implement the Mediator Design Pattern?
Below are steps to implement the Mediator Design Pattern:
Step 1: Create a Mediator Interface
The Mediator interface declares a method used by components to notify the mediator about various events. The Mediator may react to these events and pass the execution to other components.
public interface IMediator
{
    void Notify(object sender, string ev);
}
Step 2: Create a Mediator Class
Concrete Mediators implement cooperative behavior by coordinating several components.
class ConcreteMediator : IMediator
{
    private Component1 _component1;

    private Component2 _component2;

    public ConcreteMediator(Component1 component1, Component2 component2)
    {
        this._component1 = component1;
        this._component1.SetMediator(this);
        this._component2 = component2;
        this._component2.SetMediator(this);
    }

    public void Notify(object sender, string ev)
    {
        if (ev == "A")
        {
            Console.WriteLine("Mediator reacts on A and triggers folowing operations:");
            this._component2.DoC();
        }
        if (ev == "D")
        {
            Console.WriteLine("Mediator reacts on D and triggers following operations:");
            this._component1.DoB();
            this._component2.DoC();
        }
    }
}
Step 3: Create Sample Components
The Base Component provides the basic functionality of storing a mediator's instance inside component objects.
Concrete Components implement various functionality. They don't depend on other components. They also don't depend on any concrete mediator classes.
class BaseComponent
{
    protected IMediator _mediator;

    public BaseComponent(IMediator mediator = null)
    {
        this._mediator = mediator;
    }

    public void SetMediator(IMediator mediator)
    {
        this._mediator = mediator;
    }
}

class Component1 : BaseComponent
{
    public void DoA()
    {
        Console.WriteLine("Component 1 does A.");

        this._mediator.Notify(this, "A");
    }

    public void DoB()
    {
        Console.WriteLine("Component 1 does B.");

        this._mediator.Notify(this, "B");
    }
}

class Component2 : BaseComponent
{
    public void DoC()
    {
        Console.WriteLine("Component 2 does C.");

        this._mediator.Notify(this, "C");
    }

    public void DoD()
    {
        Console.WriteLine("Component 2 does D.");

        this._mediator.Notify(this, "D");
    }
}
Done, so now we can apply the code on client:
class Program
{
static void Main(string[] args)
{
// The client code.
Component1 component1 = new Component1();
Component2 component2 = new Component2();
new ConcreteMediator(component1, component2);
Console.WriteLine("Client triggets operation A.");
component1.DoA();
Console.WriteLine();
Console.WriteLine("Client triggers operation D.");
component2.DoD();
}
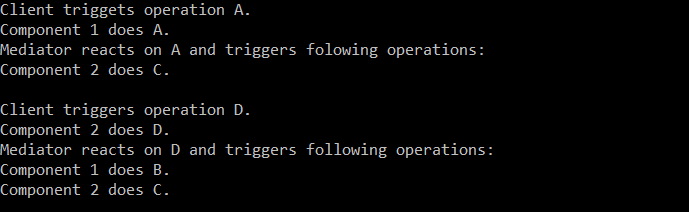
}Output:
4. Conclusion
The Mediator Design Pattern is great for your application if it has bunch of related components. I hope this article is helpful. Please let me know your thoughts in the comment section below.