The next design pattern in the Behavioral Category is the State Design Pattern. Let's take a look at the definition of this design pattern and how to implement it in C# and .Net.
Note: Code can be downloaded at my Github.
1. What is the State Design Pattern?
State is a behavioral design pattern that lets an object alter its behavior when its internal state changes. It appears as if the object changed its class.
The state pattern is a behavioral software design pattern that allows an object to alter its behavior when its internal state changes. This pattern is close to the concept of finite-state machines.
2. When to implement the State Design Pattern?
The State Design Pattern should be implemented when:
- you have an object that behaves differently depending on its current state, the number of states is enormous, and the state-specific code changes frequently.
- you have a class polluted with massive conditionals that alter how the class behaves according to the current values of the class’s fields.
- you have a lot of duplicate code across similar states and transitions of a condition-based state machine.
3. How to implement the State Design Pattern?
Below is how to implement the State Design Pattern in C# and .Net:
Step 1: Create a Context class
The Context defines the interface of interest to clients. It also maintains a reference to an instance of a State subclass, which represents the current state of the Context.
1 2 3 4 5 6 7 8 9 10 11 12 13 14 15 16 17 18 19 20 21 22 23 24 25 26 27 28 29 30 | class Context{ // A reference to the current state of the Context. private State _state = null; public Context(State state) { this.TransitionTo(state); } // The Context allows changing the State object at runtime. public void TransitionTo(State state) { Console.WriteLine($"Context: Transition to {state.GetType().Name}."); this._state = state; this._state.SetContext(this); } // The Context delegates part of its behavior to the current State // object. public void Request1() { this._state.Handle1(); } public void Request2() { this._state.Handle2(); }} |
Step 2: Create State classes
The base State class declares methods that all Concrete State should implement and also provides a backreference to the Context object, associated with the State. This backreference can be used by States to transition the Context to another State.
1 2 3 4 5 6 7 8 9 10 11 12 13 | abstract class State{ protected Context _context; public void SetContext(Context context) { this._context = context; } public abstract void Handle1(); public abstract void Handle2();} |
Concrete States implement various behaviors, associated with a state of the Context.
1 2 3 4 5 6 7 8 9 10 11 12 13 14 15 16 17 18 19 20 21 22 23 24 25 26 27 28 29 | class ConcreteStateA : State{ public override void Handle1() { Console.WriteLine("ConcreteStateA handles request1."); Console.WriteLine("ConcreteStateA wants to change the state of the context."); this._context.TransitionTo(new ConcreteStateB()); } public override void Handle2() { Console.WriteLine("ConcreteStateA handles request2."); }}class ConcreteStateB : State{ public override void Handle1() { Console.Write("ConcreteStateB handles request1."); } public override void Handle2() { Console.WriteLine("ConcreteStateB handles request2."); Console.WriteLine("ConcreteStateB wants to change the state of the context."); this._context.TransitionTo(new ConcreteStateA()); }} |
Done, you can now implement this in client:
1 2 3 4 5 6 7 8 9 10 | class Program{ static void Main(string[] args) { // The client code. var context = new Context(new ConcreteStateA()); context.Request1(); context.Request2(); }} |
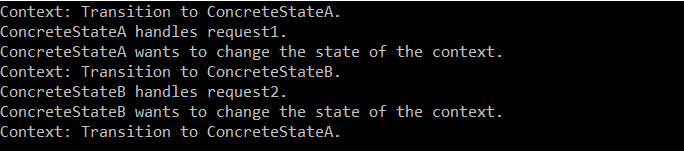
Output:
4. Conclusion
I hope this article is helpful for your projects. Please let me know your thoughts by commenting in the section below.