Accelerated Mobile Pages (AMP) focuses on delivering static content from publishers as quickly as possible and possibly rewards early adopters with a boost in rank. Let's see how to implement it in .Net MVC Core project in this article!
1. What is Accelerated Mobile Pages (AMP)?
AMP stands for Accelerated Mobile Pages. This is a way to construct web pages that will render quickly for static content. When put into action, AMP consists of AMP HTML, the AMP JS library, and the Google AMP Cache. When a page isn't optimized for mobile use, you risk the chance of increased bounce rates—30% of users leave a page if it does not load within 3 seconds. The end product of AMP drastically improves the performance of mobile websites on the internet—so much so that the load time is often appearing to be instant. It relies on existing technologies and works in collaboration with the Internet's biggest names. AMP is not a totally different technique for creating pages—it actually consists of normal HTML with a few restrictions and added specialized tags and does not require a lot of additional work. AMP JS works to make sure that the most important content is loaded quickly and clearly, while third party content such as ads are not at the forefront so that users will see their preferred content as soon as possible. AMP has discovered that content that loads quickly leads to faster reading, and in turn that results in more consumption.
2. How to create Google AMP Pages with .Net MVC Core?
To create Google AMP Pages in a .Net MVC Core project, unfortunately, we need to create a separate Pages for this purpose. However, by twisting the routing logic, we don't need to modify our business logic in Controller.
Below are steps to create Google AMP Pages in .Net MVC Core project:
Step 1: Create AMP Pages in addition to Non-AMP Pages
In addition to the existing Non-AMP Pages we have in Views folder, additional Layout and Body pages need to be created for AMP. This is what my Views folder looks like with AMP Pages.
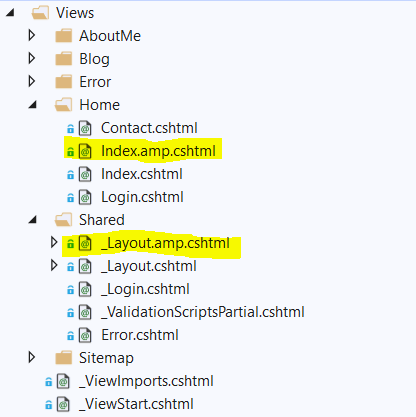
Notice that I have 2 AMP pages: 1 for Layout and 1 for Index in Home folder. This is because I just wanted to have AMP pages for my Article, which is in Home/Index.cshtml.
Below is how my Layout.cshtml and Layout.amp.cshtml. You can also visit AMP Dev website to learn more how to create AMP HTML pages for your project.
Layout.cshtml:
<!DOCTYPE html>
<html>
<head>
<meta charset="utf-8" />
<meta name="viewport" content="width=device-width, initial-scale=1.0, maximum-scale=1.0, user-scalable=no" />
<title>Lucas•o•lo•gy - @ViewBag.ArticleTitle</title>
<!--This is to link to an AMP page from a Non-AMP page-->
<link rel="amphtml" href="@ViewBag.PostUrl">
</head>
<body>
<div class="">
<main role="main">
@RenderBody()
</main>
</div>
<script src="~/js/site.js" asp-append-version="true"></script>
@RenderSection("Scripts", required: false)
</body>
</html>Layout.amp.cshtml:
<!DOCTYPE html>
<html amp>
<head>
<meta charset="utf-8" />
<script async src="https://cdn.ampproject.org/v0.js"></script>
<meta name="viewport" content="width=device-width, initial-scale=1.0, maximum-scale=1.0, user-scalable=no" />
<title>Lucas•o•lo•gy - @ViewBag.ArticleTitle</title>
<link rel="canonical" href="@ViewBag.PostUrl">
<style amp-boilerplate>
body {
-webkit-animation: -amp-start 8s steps(1,end) 0s 1 normal both;
-moz-animation: -amp-start 8s steps(1,end) 0s 1 normal both;
-ms-animation: -amp-start 8s steps(1,end) 0s 1 normal both;
animation: -amp-start 8s steps(1,end) 0s 1 normal both
}
@@-webkit-keyframes -amp-start {
from {
visibility: hidden
}
to {
visibility: visible
}
}
@@-moz-keyframes -amp-start {
from {
visibility: hidden
}
to {
visibility: visible
}
}
@@-ms-keyframes -amp-start {
from {
visibility: hidden
}
to {
visibility: visible
}
}
@@-o-keyframes -amp-start {
from {
visibility: hidden
}
to {
visibility: visible
}
}
@@keyframes -amp-start {
from {
visibility: hidden
}
to {
visibility: visible
}
}
</style>
<noscript>
<style amp-boilerplate>
body {
-webkit-animation: none;
-moz-animation: none;
-ms-animation: none;
animation: none
}
</style>
</noscript>
</head>
<body>
<div class="">
<main role="main">
@RenderBody()
</main>
</div>
<!--This is for your custom script-->
<script async custom-element="amp-script" src="~/js/site.js" asp-append-version="true"></script>
@RenderSection("Scripts", required: false)
</body>
</html>Step 2: Project Routing Setup for AMP Views
By this point, I've decided that my AMP content will be served under https://lucasology.com/amp/{Controller}/{Action}/{id}, so I just need to extend my routes in MVC to handle that:
Startup.cs:
public class Startup
{
    //Omitted Code ...

    // This method gets called by the runtime. Use this method to configure the HTTP request pipeline.
    public void Configure(IApplicationBuilder app, IHostingEnvironment env)
    {
        //Omitted Code ...
        app.UseMvc(routes =>
        {
            routes.MapRoute(
                name: "default",
                template: "{controller=Home}/{action=Index}/{id?}");

            routes.MapRoute(
                name: "amp",
                template: "amp/{controller=Home}/{action=Index}/{id?}");
        });
    }
}
Step 3: Expanding the View Engine
We need to tell the View Engine to look for the AMP pages that we created above if the URL is in this format:
https://lucasology.com/amp/{Controller}/{Action}/{id}
Create a new class called: AmpViewLocationExpander
AmpViewLocationExpander.cs:
public class AmpViewLocationExpander : IViewLocationExpander
{
    public void PopulateValues(ViewLocationExpanderContext context)
    {
        var containsStem = context.ActionContext.HttpContext.Request.Path.StartsWithSegments("/amp");
        context.Values.Add("AmpStem", containsStem.ToString());
    }
    public IEnumerable<string> ExpandViewLocations(ViewLocationExpanderContext context, IEnumerable<string> viewLocations)
    {
        if (!(context.ActionContext.ActionDescriptor is ControllerActionDescriptor descriptor)) { return viewLocations; }

        return context.ActionContext.HttpContext.Request.Path.StartsWithSegments("/amp") ?
            viewLocations.Select(x => x.Replace("{0}", "{0}.amp")) :
            viewLocations;
    }
}
Add the AMP View Expander to Razor View Engine in StartUp class:
Startup.cs:
public class Startup
{
    //Omitted Code ...

    // This method gets called by the runtime. Use this method to add services to the container.
    public void ConfigureServices(IServiceCollection services)
    {
        //Omitted Code ...

        //AMP
        services.Configure<RazorViewEngineOptions>(options =>
        {
            options.ViewLocationExpanders.Add(new AmpViewLocationExpander());
        });

        //Omitted Code ...
    }
}
That's it. Now your website includes both Non-AMP and AMP pages.
3. Conclusion
I hope this article is helpful for leveraging your website ranking on Google Search. Please let me know your thoughts by commenting in the section below.
